Thursday, December 29, 2011

Would Nutella Taste Good?


Just thinking about what to write for today’s post about Nutella is already making me salivate. Nutella newbies are always wondering what they can do with this dreamy chocolate hazelnut spread. Well for starters, anything that you typically put chocolate on will taste a billion times better with Nutella. If you’ve ever seen their commercial, the company tries to sell it as an additive to breakfast. I don’t think Nutella is a very healthy way to start the morning, but it will taste phenomenal on bread, bagels, waffles, pancakes, French toast, crepes, muffins, etc.

But we all know that sweet and salty go together better than Kim Kardashian and Kris Humphries. Nutella and pretzels? Match made in heaven. Potato chips? Absolutely. Just don’t choose BBQ. That’s just weird. Stick with plain. Another favorite combination of mine is to make a sandwich out of Nutella and raspberry preserve. It’s like dessert for lunch. Probably isn’t very healthy at all now that I think about.

And while we’re on the topic of sandwiches, spread some peanut butter on one side with banana slices and you have pure delight for lunch. Add it to mixtures that call for chocolate, such as brownies and cakes. It will make a wonderful substitute. Everything tastes good with a little Nutella love, except meat and fish…

Sunday, December 25, 2011

The Most Expensive Desserts

Sure it’s great to have a nice hearty meal, but what’s a nice meal without the perfect dessert to end the night? There’s nothing better than being able to enjoy something sweet and tasty: cake, cookies, pie, pudding, or anything else- as long as it has sugar in it. When you indulge in sweet desserts, you might worry about a costly dental bill in your future… but, how about the price of the dessert itself?
There aren’t many people who can afford to, or who would want to, spend thousands of dollars on a dessert. However, if you are insanely rich (or just insane?), here is a list of ten desserts you should order. The rest of us will sit here watering out of our mouths and eyes from the hefty price tags.
Who’d have ever thought a sweet tooth could be so expensive:

10. Noka Chocolate, Vintage Collection $854 per pound
Probably the simplest dessert on the list, the Vintage Collection provided by Noka Chooclate comes in at an expensive $854 per pound. The chocolate that is sold by this company is well known for being delicious and one of the finest made in the entire world. Noka uses all different types of cocoa from places such as Ecuador, Venezuela, Cote d’Ivoire, and Trinidad. The chocolates that are provided in the Vintage Collection are all of the dark variety, each of them made with at least 75% cocoa. If you’re new to such high class chocolate, Noka even provides flavor profiles as well as tasting guidelines. Each box is packaged in the classic Noka design.

9. Golden Opulence Sundae $1,000
Made of the best of the best, the Golden Opulence Sundae, provided by New York City restaurant Serendipity 3, will add $1000 to your bill. The sundae was created in order to celebrate Serendipity’s 50th Anniversary- otherwise known as the golden anniversary. The restaurant says that they only sell about one of these sundaes a month, but any sale is better than none, right? Known as the world’s most expensive sundae, the Golden Opulence is made with 5 scoops of Tahitian Vanilla Bean ice cream mixed with Madagascar vanilla and Venezuelan Chuao chocolate and topped off with a leaf covered in 23K edible gold. There are also other ingredients, including gold dragets, Paris candied fruits, marzipan cherries, and truffles. To top it all off, one of the world’s most expensive chocolates (Amedei Porcelana) is drizzled over the top and a Ron Ben-Israel sugar flower is properly placed. On top of the sundae you’ll also find a small glass bowl of Grand Passion Caviar, sweetened with orange, passion fruit, and Armagnac, which gives off a shiny golden color. You even get to eat the sundae in style: an 18K gold spoon is provided to eat your delicious treat out of a Harcourt crystal goblet.

8. The Brownie Extraordinaire $1,000
Yo can try this dessert next time you’re on the East Coast of the U.S.- if you’re willing to dish out $1,000. The Brownie Extraordinaire is sold at Brule, a restaurant in the Tropicana Resort located in Atlantic City, New Jersey. But, this isn’t just any brownie. It’s made out of dark chocolate that is then covered with Italian hazelnuts and served with a scoop of ice cream. Along with the sweet dessert, customers are also given a very rare and highlyexpensive port wine, Quinta do Novel Nicional, from Portugal. The wine is poured and served in a St. Louis Crystal atomizer. Although a brownie may not seem like a very lavish dessert, adding the rare glass of wine most definitely spices things up. And, if you’re a really big spender, you can choose to spend $15,000 on a Valentine’s Day package at Tropicana Resorts, which includes a hotel stay, romantic dinners, and of course the Brownie Extraordinaire.

7. The Sultan’s Golden Cake $1,000
If you’ve ever wanted to try an edible brick of gold, this dessert is definitely for you. It’s available at the Ciragan Palace Kempinski Hotel located in Istanbul, for the hefty price of $1,000. The cake is made of figs, pears, apricot, and quince that are then put into a Jamaican Rum and soaked for two years. To finish, the cake is topped with French Polynesia vanilla bean, caramel, black truffles, and a 24 carat gold leaf. It is said that the cake takes about 72-hours to make. Once it is ready to be served, it is placed inside a sterling silver cake box with a golden seal. However, the cake is usually only made per request: usually for a wedding, celebration, or for a sultan himself.

6. Macaroons Haute Couture $7,414
Macaroons aren’t too hard to find in today’s world. They are simply two meringue puffs that are held together with butter cream. They are most popular in France, and you can usually find them for a reasonable price for such a tasty dessert. However, French pastry chef, Pierre Herme, has cooked up a new and more expensive type of macaroons. The price tag at $7,414 definitely makes these macaroons not as attractive to everyone as the original recipe. Herme says that he offers a large variety of ingredients that have elevated the costs. A customer is able to choose ingredients such as balsamic vinegar, fleur de sel, red wine, peanut butter, and anything else you can think of putting between your two meringue puffs. Not all of the macaroons are this expensive, but if you choose the right ingredients, be prepared to dish out $7,000.

5. The Fortress Stilt Fisherman Indulgence $14,500
They say food presentation is very important, and when it comes to the Fortress Stilt Fisherman Indulgence, there is no doubt. In Sri Lanka, stilt fishing has become a very popular tradition that has been around for decades. The dessert pays special tribute to this pastime by portraying a stilt fishing scene made of delicious ingredients, including chocolate, exotic fruit, and Irish cream. The dish is served with a mango and pomegranate compote. It portrays a fisherman, carved out of chocolate, hanging onto the stilt. Underneath the fisherman is a perfectly placed 80 carat aquamarine. It sits on a tiny sliver of chocolate to fully represent the fisherman’s stilt. Those who order the dessert get to keep the jewel, but as of now, no one has forked out the money. The Fortress was first unveiled at the Wine3 Fisherman Stilt restaurant in Sri Lanka.

4. Frrrozen Haute Chocolate $25,000
Another Serendipity 3 dessert, the Frrozen Haute Chocolate is definitely a drink that no one will ever forget. At the price of $25,000, you can enjoy the frozen drink with the consistency of a slushy that contains a variety of cocoas from over 14 countries, milk, and of course 5 grams of 24-carat. To top it off, there’s a dollop of whipped cream and La Madeline au Truffle shavings. To ensure your money’s worth, the “Haute” cold dessert comes in a goblet that is banded with gold and decorated with diamonds: 1 carat of them, along with a take-home golden spoon. In 2007 the dessert was named the most expensive dessert in the world and was put into the Guinness World Records, but the price-tag has since been surpassed. In any case, would you want to pay $25,000 for slushy hot cocoa?

3. Platinum Cake $130,000
Created by a Japanese pastry chef named Nobue Ikara, the Platinum Cake rings in at the tiny price of $130,000, and is any platinum lover’s dream. The cake is decorated with plain white frosting and then draped with everything platinum, including chains, necklaces, pins, pendants, and even foils made of platinum that are edible. Ikara crafted the cake in dedication to many women, including Rinko Kikuchi, as well as in order to persuade more women to wear platinum. The cake was showcased by Platinum Guild International, a company encouraging more and more people to buy platinum jewelry, despite the record high rates for precious metals these days. The cake hasn’t been sold and the company has no idea whether it will be sold or not, but they do know it is worth more than many can afford. But, at least you get the chance to have your platinum cake, eat it, and wear it too. What a steal!

2. Strawberries Arnaud $1.4 million
As we’ve all heard, things are not always what they seem, and this saying applies to the Strawberries Arnaud perfectly. If you go to Arnaud’s restaurant in New Orleans’ French Quarter, you see nothing more than a bowl of strawberries topped with cream and mint. Yet, somehow they are worth $1.4 million? Look a bit harder and you’ll find a one-of-a-kind 4.7-carat pink diamond once belonging to Sir Ernest Cassel, an English royal finance advisor. Not only do you get delicious strawberries and a nice ring, the dessert comes with white-glove servers who provide wine out of a wine set worth $24,850, and of course there’s live jazz music. I mean, who would eat a $1.4 million dessert without music in the background? In any case, I say stick to your own strawberries and cream and a 25 cent plastic ring. She’ll never know the difference.

1. Diamond Fruitcake $1.65 million
For many of us, Christmas is all about spending time with family, enjoying a nice meal, and of course spending money on gifts for everyone. But, would you be daring enough to dish about $1.65 million for cake? Even better…could you afford it without having a nice overdraft fee in your bank account? Probably not; however, one pastry chef in Tokyo decided that his cake was worth this exorbitant amount of money. The chef decided to auction off the cake on Christmas Day at an exhibit entitled Diamonds: Nature’s Miracle. The chef took about 6 months to design the cake and an entire month to finish it and have it ready to be sold. 223 small diamonds are located throughout the exterior of the cake. Except for the diamonds, the rest of the cake is fully edible. This seems like a nice gift for your wife. “Here honey, have your cake and eat it too, just watch for all the diamonds”. But what woman doesn’t like diamonds, even if they are half-way covered in icing and not set in gold?

Tuesday, December 20, 2011

How To Bake Low Carb Cakes


Low carb baking tips
Lowering the carb count of baked goods requires a few easy recipe modifications. Though it is impossible to tastefully create a cookie, cake or other baked dessert with zero carbs, you can significantly reduce them with the following tips.
Cut the sugar
Even though sugar is all carbs – and simple quickly digested carbs at that – it does serve a significant function in baked goods. Sugar provides the expected sweetness of desserts as well as leavening, color, and the moistness that makes cookies, cakes and quick breads melt in your mouth.
However, in addition to simply cutting the sugar in half (with most recipes, you won’t even notice a taste difference), you can opt for sugar substitutes, which are typically even sweeter than sugar and provide few, if any, carbohydrates. Be sure that the sugar alternatives you use are actually made for baking – read the label for appropriate substitution.
Find a lower-carb flour
With the vast array of low carb cookie, cake, pie crust and quick bread mixes, you can make your low carb holiday baking a breeze.
If, on the other hand, baking from scratch is an integral part of your holiday spirit, find low carb versions of your favorite recipes, many of which substitute soy flour, whole wheat flour or even almond flour for all purpose flour.
You can also lower the carb count by using your traditional recipes and substituting one-fourth to one-third of the all purpose flour with soy, whole wheat or almond flour.
Another option is to look for flour-less desserts recipes (for example, flourless chocolate cake or chocolate torte) but make sure they are also lower in sugar.
Lower-carb substitutions
For baked goods that call for chocolate chips, substitute low carb chocolate morsels.
Replace part or all of the dried fruit with finely chopped fresh fruit (be sure to pat it dry or the juice will make the texture soggy). You can also replace part of the dried fruit with chopped nuts.
For recipes that call for candy – like candy cane brownies or peanut butter cup cookies – use low carb or sugar-free candy.
Cheesecake is an excellent low carb (and very decadent!) dessert. Replace the graham cracker crust with a crushed low carb variety of cookie or substitute half of the crushed cookie with finely chopped nuts or almond flour. For the filling, substitute an equivalent amount of alternative sweetener for the sugar.
When recipes call for freshly whipped cream, omit the sugar – the dessert itself will be sweet enough – or replace it with an equivalent sugar substitute.

Friday, December 16, 2011

How To Make Cheesecake

I’ve been in the process of perfecting a baked cheesecake recipe and I won’t be changing it much more after this latest version.
When I say ‘perfecting’, I mean to my personal taste…meaning a substantial, flavoursome base, New-York-type real vanilla cheesecake with some density in its texture but not too claggy (so it’s still refreshing), with an element of tartness, in this case raspberries.
My plan was to develop a gluten-free base as an option but this turned out so well I’m not saving it for necessary dietary requirements! It just proves how working within limited parameters can sometimes be a positive thing. Click on more to see the recipe…
Ingredients (for an 8″ cheesecake)
Gluten Free Base:
Ingredients:
75g Buckwheat Flour
40g Cornflour
75g Chestnut Flour
60g Light Muscavado Sugar
Pinch of Salt
100g Butter (room temperature / slightly softened)
75g Butter (melted - this is to mix with the above mixture after it’s baked)
Method:
Preheat oven to 170C/325F/Gas 3
Mix the dry ingredients together and rub in the 100g Butter until a crumbly mix forms which you could form into a ball and roll out as biscuits or pastry if you wanted to, but leave it in crumble / streusel form for this.
Spread the crumble onto a lightly greased or lined baking tray and bake for about 7 minutes before taking it out and stirring around a bit to ensure fairly even baking. Return to the oven for another 7 minutes or until the crumble is just getting crunchy without burning.
Allow the crumble to cool for at least an hour before making into the base.
To make into the cheesecake base, put the crumble into a food processor and process just enough to make an uneven ‘rubble’. Add the melted butter and process one pulse at-a-time until combined.
Line an 8″/20cm loose-bottomed sponge tin with baking parchment (or butter wrappers) so that the parchment extends an inch or so above the top (the cheesecake’s quite deep).
Press the Base mixture into the bottom of the tin.
Cheesecake Mix:
700g Medium Fat Soft Cheese (eg Philadelphia - not the reduced fat version though)
150g Soured Cream
175g Unrefined Caster Sugar
25g Cornflour
2 Eggs
1tsp Vanilla Extract
A generous handful of frozen raspberries.
Method:
Set oven at 150C/300F/Gas2.
Put the Soft Cheese, Soured Cream and Caster Sugar in a food processor and mix until smooth. Srape down the sides.
Sprinkle the Cornflour over the top of the mix and process until blended.
Add the Eggs and Vanilla and process until blended. Scrape down the sides and process for another few seconds.
Pour the mixture onto the prepared base.
Scatter some frozen Raspberries on the top.
Bake for about an hour - the cheesecake should be just set but retain a slight wobble in the centre which will firm up as it cools.

Tuesday, December 13, 2011

Van Houten Chocolate Cake Recipe

Van Houten Chocolate cake, anyone? If you are looking for a tried and tested recipe for chocolate cake, you might want to try this out. This chocolate cake recipe is actually modified from the scroll cake recipe. Medium moist, light and buttery, it makes you want to have another piece once you’ve eaten one. Van Houten Cocoa Powder is used in this recipe. If you can’t find it, you might also want to try the Tudor brand. As for butter, we use Golden Churn brand. SCS butter is also a good substitute.
To prevent sticking, ensure that the baking pan is well greased with butter followed by dusting with flour. Cool the cake over a rack before storing.
Oh, in case you were wondering, the Van Houten Chocolate Cake is on the foreground. The other pieces of cakes are the famous Sarawak Layer Cake (Kuih Lapis Sarawak). Looks good, don’t they?
But for now, let me share with you the recipe for Van Houten Chocolate Cake :-
Ingredients
10 oz. Butter
10 oz. Castor Sugar
7 ½ oz. Flour
1 oz. Cocoa Powder
8 Eggs (separate egg yolks from egg whites)
2 ¼ teaspoon Baking Powder
Method
Beat butter and sugar for 8 minutes (or until white).
Add egg yolks one by one and continue beating for another 10 minutes.
Fold in flour sifted with cocoa powder and baking powder (sifted 2 to 3 times).
In a separate bowl, beat egg whites until stiff and add it to the butter mixture.
Pour mixture onto a baking tray (8″ inch, square tin)
Bake in a 300°F (or 150°C) oven for about 1 hour and 10 minutes.

Friday, December 9, 2011

Chocolate Dessert Lasagna Recipe

Ingredients
1 (8-ounce) package no-boil lasagna noodles
2 pounds ricotta cheese
1 cup powdered sugar
1/2 cup unsweetened cocoa
2 large eggs
1 1/2 cups mini chocolate chips
1 orange, zested
1/2 cup roasted pistachios
4 ounces white chocolate, coarsely grated
Directions
Preheat the oven to 350 degrees F.
Bring a large pot of water to the boil and cook the noodles for 1 minute. Drain them and put them into a bowl of ice water to stop the cooking. Drain again and lay on paper towels to dry.
Whisk together the ricotta, sugar, cocoa powder, and eggs on medium speed with a hand or stand mixer, scraping down the sides of the bowl, until it is well blended. Stir in the chocolate chips and orange zest. Spread 1/4 of the cheese mixture into the bottom of an 8 by 8-inch baking dish. Sprinkle some of the pistachios over the top and press on a layer of noodles. Repeat, ending with the ricotta mixture and pistachios. Bake for 35 to 40 minutes, or until the lasagna has risen. Remove the pan from the oven and evenly sprinkle the white chocolate over it. Let cool, cut, and serve.

Tuesday, December 6, 2011

How To Make Pine Nut Biscotti

How to make Pine Nut Biscotti - Italian Dessert Recipe? These are the ultimate dunking cookies: Italian wedges baked twice to become very hard, just waiting to be dipped into a sweet dessert wine like Vin Santo; although i also seen them dunked in red wine in Italy. The sugar is added to the dry ingredients, not beaten with the wet, to create a drier, crisper cookie. Pine nuts are soft, so a little cornmeal in the dough gives these biscotti extra crunch. Makes about 48 biscotti. Ingredients and easy directions:
PINE NUT BISCOTTI - ITALIAN DESSERT RECIPE
INGREDIENTS :
2/3 cup pine nuts
2 cups all-purpose flour, plus additional for dusting
3/4 cup sugar
1/4 cup yellow cornmeal
2 teaspoons baking powder
1/2 teaspoon salt
3 large eggs, at room temperature
2 tablespoons brandy
DIRECTIONS :
Position the racks in the top and bottom thirds of the oven and preheat the oven to325°F. Line two baking sheets with parchment paper or silicone baking mats.
Place the pine nuts in a dry skillet set over medium-low heat; cook, stirring often, until lightly browned and aromatic, about 4 minutes. Set aside while you make the batter.
Whisk the flour, sugar, cornmeal, baking powder, and salt in a medium bowl; set aside.
Beat the eggs and brandy in a large bowl with an electric mixer at medium speed until well combined but not fluffy, about 2 minutes. Turn the beaters off, add the fl our mixture, and beat at low speed until a soft but crumbly and dry dough forms
Scrape down and remove the beaters. Work the toasted pine nuts into the batter with a wooden spoon.
Lightly dust a clean, dry work surface with flour, then turn the dough out onto it. Knead until smooth and the pine nuts are evenly distributed, about 2 minutes. Divide the dough in half and roll each half under your palms into a 12-inch-long log.
Place each log on a separate baking sheet and bake in the top and bottom thirds of the oven for 10 minutes. Reverse the sheets top to bottom and continue baking until firm, lightly browned, and a little puffed, about 15 more minutes.
Remove the sheets from the oven and cool the logs on them for 30 minutes. (Maintain the oven's temperature.)
Transfer the logs to your work surface and use a serrated knife to slice them into 1/2-inch-thickpieces, cutting on the diagonal to get long, oblong biscotti. Place these cut side down on the baking sheets.
Return them to the oven to bake for 5 minutes. Remove them from the oven, flip all the cookies over to the other cut side, reverse the sheets top to bottom, and continue baking until dry and crunchy, about 5 more minutes.

Friday, December 2, 2011

Peanut Butter Chocolate Chip Brownies

Hey everyone! I've got a yummy new recipe to share! These were awesome. They really do have the texture of a brownie, even though they're not your typical all chocolate brownie. I used chunky peanut butter, which gave them the addition of peanuts, which was great along with the chocolate chips. You can use regular, it's whatever you prefer. They're not only yummy, but they are also super easy to make! They are one of my favorite kinds of recipes: ONE BOWL! Who's with me there? Next time you're looking for an easy treat, whip these up!
Ingredients
cups Packed Brown Sugar
1/4 cup Butter or Margarine, melted
1/2 cup Peanut Butter
1 teaspoon Vanilla Extract
3 Eggs
1 1/2 cups All-Purpose Flour
3/4 teaspoon Baking Powder
1/4 teaspoon Baking Soda
1/2 teaspoon Salt
1 cup Semi-Sweet Chocolate Chips
Preparation
1
In large bowl, beat brown sugar, butter or margarine, peanut butter, vanilla, and eggs until well blended. Stir in flour, baking powder, baking soda, and salt; mix well. Spread batter into a greased pan and bake in a pre-heated 350 degree oven for 25 to 30 minutes or until golden brown and toothpick inserted in middle comes out clean.

Tuesday, November 29, 2011

HCG Diet BBQ Sauce


The HCG Diet allows only certain foods to be a part of the daily menu. There are many foods that are prohibited, as they would interfere with the functioning of the HCG hormone during the diet. In the long run the HCG Diet plan causes a lifestyle change helping the dieter to consciously choose healthy options over processed unhealthy foods. While the HCG Diet Plan has many restrictions on the foods that can be a part of the diet there is no need to sacrifice taste while counting the calories. The internet is full of sites with HCG approved recipes & in Dr Simeon’s time a BBQ sauce would definitely not have been approved of but modern methods allow us to make HCG Diet BBQ Sauce well within the limits of the HCG Diet. This can be had with the approved portion of grilled/smoked lean meats as part of the meal plan.
Tips to Prepare HCG Diet BBQ Sauce from the Comfort of Home
Take 2 strips of fat free turkey Bacon chopped finely, 1 small chopped onion, 1 clove of garlic, 1 6oz can of organic tomato paste, 1 12oz can of Diet coke, 1/4th cup of sugar free catsup, 3 teaspoons of mustard paste, 1tbsp Worcestershire sauce, a pinch of clove powder, ½ cup of water, a pinch of chili/paprika.
Lightly sauté the bacon in a few drops of olive/coconut oil, add onion & cook over a medium flame for a few minutes, add garlic & stir fry. Now add all the remaining ingredients with the water & stir. Simmer for 20 minutes. Adjust the flavor by adding some vinegar or a liquid sweetener as per taste. This can be stored & used as required. This recipe makes 10 servings of 1/4th cup each of 15-30 calories approx. Always use organic & preservative products where ever possible.
There are many sites with HCG approved meal menus to try from to make the diet easier & tastier.

Friday, November 25, 2011

Tips For Angel Food Sweet Cake

This is my absolute favorite Angel Food Cake in the world! I love to serve it warm with gluten free ice cream on top, trust me it makes the best dessert and is so satisfying when you have a sweet craving. Don’t worry that one large cake may be too much if you are the only one that will be eating it because this cake freezes so well! It really is the perfect dessert.
The trick to this recipe is to make sure the eggs are beaten long enough and that the cake is baked enough.
Ingredients
2 cups egg whites, at room temperature
1/3 cup potato starch
1/3 cup cornstarch
3/4 cup white sugar
1/2 teaspoon salt
1/3 teaspoon cream of tartar
1 teaspoon vanilla extract (or orange- yummy!)
1 teaspoon almond extract
1 cup sifted white sugar
Directions
Preheat oven to 375°
Bring the egg whites to room temperature, if taking directly from the fridge let them sit out for 45 minutes or so.
Sift together the potato starch, cornstarch, and white sugar (the unsifted one);and set aside.
In a big mixing combine egg whites, salt, cream of tartar, vanilla and almond extracts and beat on the highest speed until they are stiff and stand in soft peaks (approx 2 mins or so)
Change the mixer to a medium speed and slowly add the cup of sifted sugar for about one minute or until the eggs whites are stiff.
Next, change the mixer to the lowest speed and slowly sprinkle in the sifted flour mixture for approx a minute and half.
Now carefully pour the cake batter into an ungreased 10 inch tube pan and bake at 375° for 50 to 55 minutes. Make sure not to under bake, if anything over baking is better with browning the top.
Remove from oven and set on a wire rack to cool for at least 20 minutes. Turn upside down and flip again so that it’s upright and serve or wrap up!

Wednesday, November 23, 2011

Give You Free Dessert Recipes

You still can have chocolate brownies, cookies, ice cream and more!
Dealing with having to eat gluten free can be somewhat challenging at times. You have to read labels very carefully and scrutinize the menu while dining out but once you get used to it- it becomes second nature. You will find that getting a dessert that is gluten free on a menu (even these days) is quite rare so you will have to learn to become a baker- don’t worry I’ve made it easy!
Many of the gluten free cake and cookie mixes that are prepackaged in your supermarket are pretty good and most of them are easy to make. Any of the commercial desserts listed on this page to the right I have personally tried and find them to be not only delicious but just so easy to make and bake that I usually prefer to go the prepackaged route.
Everyone I know seems to enjoy this collection of recipes. I have brought them to many a party and never has anyone ever suspected they were eating a dessert that does not contain gluten.
As you may already have noticed I tend to stick to easy recipes (quick and delicious) so you can guarantee that you won’t have any trouble with these! When baking I have found that its one of those things in life that must be exact so make sure to measure precisely.
Now preheat your oven and get ready to make the easiest, tastiest desserts on the planet!

Friday, November 18, 2011

Wonderful White Chocolate Desserts

  White chocolate—a favorite confection composed of cocoa butter, sugar and milk—is a sweet and delicious relative of milk or dark chocolate. Sometimes presented as vanilla-flavored, the amiable treat works well as icing, a chunky ingredient in cookies and in a variety of other desserts. Below, we’ve listed 8 great recipes that incorporate white-chocolate flavors into your dessert foods—from a decadent White Chocolate Cheesecake to the citrus-infused Orange Walnut White Chocolate Batons—sure to please even the harshest of cocoa connoisseurs.
  White Chocolate Recipes:
  1. White Chocolate Cheesecake
  2. Tropical White Chocolate Chip Cookies
  3. White Chocolate Strawberry Squares
  4. Orange Walnut White Chocolate Batons
  5. Chocolate Cake with White Chocolate Frosting
  6. White Bittersweet Chocolate Chunk Bars
  7. Marbled Chocolate Bark
  8. White Chocolate Raspberry Heart Cheesecake
  Readers can create a one-of-a-kind cookbook using any of the thousands of recipes on WomansDay.com. Plus, their own recipes, comments, photos and notes can also be included. Once compiled, the book can then be printed and bound or downloaded as a PDF document, making a truly unique gift or personalized must-have reference for every home cook.

Monday, November 14, 2011

Whole Grains Can Cut The Inflammatory Disease Risk?

  Researchers in the American Journal of Clinical Nutrition in June 2007 found that people who eat proper amounts of whole grains are less likely to develop rheumatoid arthritis, asthma, and other inflammatory conditions, which certainly is a good healthy living concept.
  Researchers say that those who ate at least four to seven servings of whole grains per week were 35 per cent less likely to die of an inflammatory disorder than those who rarely or never ate them. This study was done on 27,300 postmenopausal women for 17 years. This is great news!
  According to the Canada Food Guide, which emphasizes the use of whole grain breads and cereals, fruits, vegetables, dried beans, peas and lentils, fibre is found in plant foods. Canada Food Guide says that there is no fibre in foods of animal origin.
  The average Canadian diet allows us about 15 grams of fiber per day. Researchers say that, as adults, we are to double that current intake to 30 grams of fiber per day.
  By eating a fibrous diet as a lifelong healthy eating venture, this way of eating helps in the prevention and treatment of a variety of health ails, such as diverticular disease (www.wikipedia.com), constipation, polyps in rectal area, heart disease, hiatus hernia, obesity and some forms of cancer.
  In order to stay with the High Fibre Recommendations:
  * Obtain fibre from a variety of different foods; all foods contain different amounts of fibre.
  * Use "whole grain" breads, muffins, bagels and try for at least five servings per day.
  * Choose "vegetables and fruit" more often, especially when it comes to Dessert time. The fruit is best if eaten raw, but can be eaten both cooked and raw, and try to eat the skin as well, as it contains much of the fibre.
  * For your dried beans, peas and lentils, put in soups, casseroles and salads for your soluble fibre. Lentils make a wonderful soup and salads are marvelous with feta cheese and olives. Be creative.
  * Increase the fibre in your healthy eating gradually to avoid bloating, gas and any digestive upsets.
  * Always remember to drink plenty of fluids per day - aim for 6 to 8 cups, which includes milk, juice, water, clear teas. Caffeine does not count as it draws fluids from the body. Drinking your fluids will help with your digestion and bowel regularity as well.
  * Exercise regularly as it will help you to have regular bowel habits.
  * Always read labels for fibre content on foods if possible. Check your cookbooks, and make yourself a guru on fibre rich goods. As an idea 3 grams fibre per 1/2 cup serving of recommend fibre rich foods.
  We have used the Canadian Health Guide as a ruling; in fact, the American Food Guide would be similar. Make it a point of finding out all the foods that contain fibre, separate the lists into grains, fruits, vegetables, add your liquids to the list and tack it onto your refrigerator as a reminder of how to eat, amounts and servings, and help yourself into high fibre for your healthy living.

Monday, November 7, 2011

Behind the scenes of Hong Kong's most loved egg tart


Many Hong Kong residents will recollect the smell of crispy cookie crust and sweet egg custard along Lyndhurst Terrace in Central with great affection. After all, if they were good enough for Chris Patten, the last British governor and famously a fan of the product, they should be good enough for the rest of us.

We are talking about Tai Cheong bakery.

For almost six decades, Tai Cheong has witnessed and experienced the city’s growth, including property inflation. Its owners were forced to close it down in 2005 due to high rent, but reopened it later in a nearby spot, determined to change.

As a part of Tao Heung Group now, the once small bakery has swollen into a corporate business. Despite the convenience given by 14 branches (excluding the one in Macau), many Tai Cheong fans, local and international, still prefer to go to the Central main store, hoping to have a taste of the good old days and to sooth their nostalgia.

We thought it was time to visit one of the new stores, and speak to an egg tart expert there instead.

The Lok Fu branch opened in April. The only trace of the age of the brand is through the old pictures on the wall. Chung Chi Wai has been a baker for 20 years and is charged with maintaining the success of the brand at this site. “Of course it is an immense pressure for me,” he says.

“The trickiest part is to be careful with the amount of filling poured,” Chung says as he calmly fills every empty shell with thick egg liquid. “When I first learned to be a baker, I always have to spoon the filling here and there to make them even.”

Another characteristic of the new store is the open kitchen design. Fans can tip-toe to see how the egg tarts are made.

The timing is essential. First, the egg tarts are baked for 13 minutes before Chung rotates the tray “extremely carefully." Then, four minutes of waiting.

Beep beep beep. The timer goes off. Chung’s hand is already on the oven handle as he asks, “Are you ready?” The egg tarts arrive, the crust brownish yellow and the wobbling egg custard looks like it is going to burst open at any second.

“When the baking is done well I am happy,” says Chung.

It is true that the new stores may not share the old-school feeling of  the Central main store. But they are not short of support from long-term fans. 

Sunday, November 6, 2011

Make Your Own Ice Cream


Nothing says summer more than melting scoops of ice cream, so learn to make a batch of classic vanilla, and once you’ve got the knack, adapt the recipe by swirling in luxurious flavourings.

If you don’t have an ice cream maker, then you can still make great ice cream by hand. Pour the cooled custard mixture into a large freezerproof container (this will give a greater surface area and help the mixture to freeze faster), cover tightly with cling film, then freeze for 1½-2 hours until frozen at the edges. Remove the ice cream from the freezer, transfer to a bowl if necessary, then beat using hand-held electric beaters until smooth. Return to the freezer, then repeat this step 2 or 3 more times. This beating process will prevent ice crystals forming and ensure you end up with a smooth, rich ice cream..

If you add whole fresh fruit pieces to ice cream they freeze solid whereas cooked fruit stays softer. A good tip is to add a fruit coulis, compote or purée to your ice cream base to give a spectacular rippled effect. Simply place 450g blueberries, or any seasonal berry, in a small pan with 40g caster sugar and the juice of ½ lemon. Heat gently, stirring from time to time, for about 8 minutes, until the fruit begins to burst. Cool completely then ripple into the churned ice cream. This is equally delicious served warm or cold spooned over the finished ice cream.
                          
Use these to decorate any flavour of ice cream. Preheat the oven to 120°C/fan100°C/gas ½. Using a very sharp knife, cut pears, apples or a pineapple into very thin slices, about 2mm thick, from stalk to base (or across the width for a pineapple). You can also use a mandolin for this. Lay on a baking sheet lined with non-stick baking paper, spaced well apart, and sprinkle each slice with ¼ tsp caster sugar. Bake for about 2 hours, turning halfway, until crisp and golden. Allow to cool and crisp up on wire racks, then store in an airtight container for up to 2 days.

Saturday, November 5, 2011

Ice Cream Sandwich in Scotland and the United States

In Scotland they are known as 'sliders' or an ice cream wafer - usually served as vanilla ice cream sandwiched between two rectangle, chocolate wafers.

In Scotland one can buy sliders consisting of vanilla ice cream sandwiched between two wafers. Then you can have a nougat wafer (Ice Cream sandwiched between a wafer and a nougat wafer). A nougat wafer is an Italian style meringue between two wafer biscuits and then the meringue encased in chocolate. Then there is the double nougat, Ice Cream sandwiched between two nougat wafers. The wafers are NOT covered in chocolate, only the edges. You would also get snowballs (Italian style meringue covered in chocolate and coconut) and served in cafe's with Ice cream, Oysters, made out of 2 wafer biscuits in the shape of a shell, with cream inside and chocolate and coconut on the outside to hold them together, They are prized open and ice cream added - delicious. The main manufacturer in Glasgow, and most people said the best, was the Verbest Cream Wafer Company which ceased after the manufacturer died in 1963.

In the United States, an ice cream sandwich is a slice of ice cream, commonly vanilla although other flavors are often used, sandwiched between two wafers, usually chocolate and rectangular. The current version was invented in 1945 by Jerry Newberg when he was selling ice cream at Forbes Field. Pictures from the Jersey Shore circa 1905. "On the beach, Atlantic City," 8x10 inch dry plate glass negative, Detroit Publishing Company, show Ice Cream sandwiches were popular at 1c each .

Alternatives to wafers are often used, such as chocolate chip cookies. Many companies offer alternatives to the conventional ice cream sandwich as well, such as San Francisco's It's-It, who use oatmeal cookies and dip the sandwich in dark chocolate, New Jersey-based Rice Creams Inc. uses a combination of crispy marshmallow wafers and ice cream.

August 2nd is promoted in the United States as 'National Ice Cream Sandwich Day', although the origins of the designation are unclear and there appears to be no evidence to support any official 'national' designation.

Thursday, November 3, 2011

Desert Taste of Home

Ingredients

  • 1 package (12 ounces) white baking chips
  • 2 tablespoons shortening, divided
  • 1 package (16 ounces) double-stuffed Oreo cookies
  • 32 wooden Popsicle or craft sticks
  • 1 cup (6 ounces) semisweet chocolate chips

Directions

  • In a microwave, melt vanilla chips and 1 tablespoon shortening at 70% power for 1 minute; stir. Microwave at additional 10- to 20-second intervals, stirring until smooth.
  • Twist apart sandwich cookies. Dip the end of each Popsicle stick into melted chips; place on a cookie half and top with another half.
  • Place cookies on a waxed paper-lined baking sheets; freeze for 15 minutes. Reheat vanilla chip mixture again if necessary; dip frozen cookies into mixture until completely covered; allow excess to drip off. Return to the baking sheet; freeze 30 minutes longer or until set.
  • Melt the chocolate chips and remaining shortening; stir until smooth. Drizzle over cookies. Store in an airtight container. Yield: 32 servings.

Wednesday, November 2, 2011

Red Velvet Cupcakes and My Big Moment on Just Desserts

  
I don’t make a lot of cupcakes, but since I’ve always been fascinated by the red velvet cake, I decided to try a version based on this venerable American classic.   I’ve gotten so many requests for cupcakes and red velvet cakes that I figured I’d kill two food wishes with one video. They came out really well, and as I tasted, I actually caught myself daydreaming about being on Top Chef Just Desserts.
I imagined I’d furiously finished frosting these red velvet cupcakes just as time expired (I think the faux-hawked prima donna with the Jacques Torres tattoo next to me hid the cream cheese to screw me over). I bring them up to the judge’s table, and watch as the lovely Gail Simmons takes a big bite. She swallows, smiles, and then says, “Really not that bad for a food blogger.” Okay, so she’s too classy to ever say that, but still, it would be pretty cool.

Anyway, back to reality. I will also post the cream cheese frosting recipe next week, just in case you’re wondering. I joke about the red food coloring in the clip, and it does give the cake such a unique look, but feel free to leave it out if that’s not your thing.   Party season is upon us, and what holiday dessert table wouldn’t benefit from a plate of these classic cupcakes? It would be like Johnny Iuzzini's face without the side burns. In other words, just not as good. I hope you give these a try soon. Enjoy!
Ingredients for 12 Red Velvet Cupcakes:
Dry:
1 1/3 cups all-purpose flour
3 tablespoons cocoa powder
1/4 teaspoon baking soda
1/2 teaspoon fine salt
1 teaspoon baking powder
Wet:
4 tablespoons softened butter
1 cup white sugar
2 large eggs
3/4 cup buttermilk
2 teaspoons white vinegar
1 teaspoon vanilla extract
1 tablespoon red food coloring
Bake at 350 for about 22 minutes

Monday, October 31, 2011

A Pumpkin Bowl of Recipes

  After the colonists came over to America, they used pumpkin in side dishes, desserts, stews, soups, and even beer. Although the colonists had a good idea when it came to baking with pumpkin, I have to admit, when it comes to choice of drinks, I’ll choose a pumpkin spice latte over pumpkin ale and save the ale for the stew.

  If you are addicted to pumpkin spice lattes and can’t afford to buy one every day, you might want to try the Pumpkin Spice Latte recipe below. Depending on how good of coffee you have and whether or not you grind your coffee fresh, the pumpkin spice latte made from the recipe below tastes pretty darn close to one from Starbucks.
When it comes to baking with pumpkin, sugar pumpkins, also known as pie pumpkins, have the best flavor. While Jack-o-lantern pumpkins are grown for their large shell, sugar pumpkins are grown for their flavorful insides. With a thicker shell, these types of pumpkins are delicious when baked and have the tasty flavor of their squash relatives.
For an alternative to the bread bowl, take advantage of the plentiful supply of sugar pumpkins available at grocery stores and farmers’ markets. When it comes to homemade soups and stews, sugar pumpkins make delicious and edible bowls without all the extra carbohydrates. Whether you are looking to add extra vegetables to your diet or simply looking for a way to add a decorative touch to your dinner table, be sure to add a few of these pumpkins to your shopping list.
Not only are sugar pumpkins a nice alternative to the festive fall dinnerware sold in stores right now, nothing beats the look of them on your table. After baking just until the inside of the pumpkin is tender, each individual pumpkin can be served as its own serving bowl. The baked pumpkin adds delicious flavor to the other ingredients inside and can be eaten just as you would baked squash. As cute, edible decorations, you might find that your children who otherwise wouldn’t eat squash as a side will eat these with their stew or soup.
Since stews and soups always taste better when heated the se

  cond time around, I like making a pot the day before and using the leftovers when filling pumpkin bowls for the next day’s meal. Cute pumpkin bowls will perk up your otherwise boring leftover food while serving the dual purpose of adding bright color to your kitchen. Not only that, if you are serving these for company, these bowls make it easy to entertain by taking the place of a fancy centerpiece.
For an easy recipe to fill your sugar pumpkins with, the recipe for Beef Stew below is tasty and filling. Make sure, though, that you bake your pumpkin bowls on a large cookie sheet or jelly roll pan. Like many recipes made in my kitchen, I learned this one the hard way. After baking a large pumpkin filled with stew for way too long, three hours to be exact, the bottom of the pumpkin baked itself into my oven rack. After lifting up the large seventeen-pound pumpkin, the bottom broke away and broth from the stew spilled all over the bottom of the oven. Fortunately, a new idea was born out of this kitchen catastrophe. Thanks to my oldest daughter, the idea for the individual pumpkin bowls came about, becoming our newest and favorite way to bake our fall squash.
In keeping with a pumpkin-themed meal, delicious pumpkin desserts don’t come any easier than the recipe for the Pumpkin Sheet Cake below. Capable of being whipped up in minutes, the recipe below is one I’ve been making for years. As one of my kids’ favorite cakes, I make this one a lot throughout the fall and winter. Depending on the size of the crowd, this recipe can be halved for a standard baking pan or in a large jelly roll pan for a crowd of 25. Although some might prefer this cake served with pumpkin ale, some like myself will opt for the pumpkin spice latte. However, whatever your drink, three cheers to your next fall meal.

  Pumpkin Stew (6 servings)
2 pounds beef stew meat
4 tablespoons olive oil, divided
6 cups water
4 beef bouillon cubes
1 can (14.5 oz.) diced tomatoes, not drained
4-6 medium potatoes, peeled and cut into 1-inch cubes
6 medium carrots, sliced
1 large sweet onion, diced
1 teaspoon pepper
1 teaspoon salt
6 sugar pumpkins
1) In a Dutch oven, brown meat in 2 tablespoons oil. Add water, bouillon, tomatoes, potatoes, carrots, onion, pepper, and salt.
2) Bring all ingredients to a boil. Cover and simmer until vegetables are tender.
3) Meanwhile, remove tops of pumpkins and set aside. Discard seeds and loose fibers from inside. Place pumpkins on a large cookie sheet. Scoop stew into pumpkins and replace the tops. Brush outside of pumpkins with remaining 2 tablespoons of oil.
4) Bake at 350 for 1 ½ hours or just until the inside of the pumpkins are tender (do not over-bake). Serve in bowls or plates.
Kitchen Tip: If you like extra broth, add an extra cup or two of water to the recipe for Pumpkin Stew above.
Pumpkin Sheet Cake (20-25 servings)
2 ¼ cups pumpkin puree
3 cups sugar
1 ½ cups oil
6 eggs, slightly beaten
3 cups flour
1 Tablespoon baking soda
1 Tablespoon ground cinnamon
½ teaspoon salt
1) In a mixing bowl, combine pumpkin, sugar, and oil. Beat in eggs. Add flour, baking soda, cinnamon and salt. Mix just until blended.
2) Pour batter into a greased 15 in. x 10 in. x 1 in. jelly roll pan. Bake at 350 for 40 minutes or until cake tests done. Cool completely.
Cream Cheese Frosting
8 oz. cream cheese, softened
5 cups confectioners’ sugar
3-4 Tablespoons milk
1 teaspoon vanilla
1) For frosting, beat cream cheese, sugar, milk, and vanilla.
2) Spread over cake.
Homemade Pumpkin Spice Latte (makes one tall latte)
1 cup milk
1 tablespoon canned pumpkin
1-2 teaspoons sugar
1 tablespoon vanilla extract
½ teaspoon cinnamon
½ cup strong coffee
1) In a saucepan, combine milk, pumpkin, and sugar. Cook over medium heat, stirring constantly until liquid is steaming. Remove from heat. Add vanilla and cinnamon. Whisk until thoroughly combined.
2) Pour pumpkin mixture into a large mug and add coffee. Top with whipped cream, if desired, and add a light sprinkling of cinnamon or nutmeg. Drink and enjoy!
About this column: In The Kitchen With Jodee brings you easy, economical recipes from Avon Lake's mom-of-eight, Jodee Brooks.

Sunday, October 30, 2011

Explore Desserts That Taste Good & Make You Feel Great!

  One of the easiest ways to cut calories and get away from high sugar and high carbohydrate desserts is to indulge in healthy desserts. It’s those sugary, carbohydrate laden desserts that are standing in the way of becoming healthier. However, there’s no denying that everyone wants to enjoy a delicious dessert every now and then.
Nearly everyone has a sweet tooth to some degree and ending a delicious meal with a sweet treat seems very natural indeed, especially at holiday and family gatherings.
Fortunately there are some tips, tricks, and ideas that for low carb desserts and sugar free desserts that can be easily prepared. These desserts don’t take much time and the ingredients are inexpensive. However, some of these tasty treats contain carbohydrate-free sweeteners, so if you have issues with an irritable bowel caused by these kinds of sweeteners, be sure to carefully read all the ingredients in each recipe you are considering.
If you like to bake, but aren’t crazy about exploring new options on your own, there are a few things that can be used for excellent dessert items when cutting carbs, calories, and sugar from your diet. An ideal inexpensive, low carb, and no fat dessert is sugar-free gelatin. Sugar-free gelatin provides a light dessert with a sweet, fruity taste that will satisfy anyone. Adding a single teaspoon of a non-dairy whipped topping makes gelatin into a satisfying dessert that will surely please anyone. Adding a teaspoon of fresh fruit will make ordinary gelatin into a light tasty parfait that’s low in carbs and calories.
Sugar substitutes like Nutrasweet can be used or one of the new sweeteners that are made from natural plant extracts. These can be used to create amazing desserts with no calories and lower alcohol sugar content.
Healthy desserts are typically simple. Things like berries or fruit with some extra flavorings make excellent healthy desserts. For example, add some fresh raspberries or pineapple chunks to some fat free yogurt. It’s easy to satisfy a sweet tooth with the combination of tangy and sweet combination and cut down on calories, fat, carbs, and sugar.
Another great healthy dessert idea is to slice bananas lengthwise and sprinkle them cinnamon. When looking for healthy dessert ideas, choose fresh ingredients that are in season and substitute use these instead of other rich desserts that are packed with carbohydrates.
Sometimes it’s a little more of a challenge to prepare sugar free desserts, especially if you’re cooking for someone that has diabetes. Preparingsugar free desserts for someone that’s following a diabetic diet is difficult because fruit is packed with the kind of sugar that’s bad for a diabetic.

Friday, October 28, 2011

Time for Apple Picking

  We were very tired, we were very merry--
We had gone back and forth all night on the ferry;
And you ate an apple, and I ate a pear,
From a dozen of each we had bought somewhere;
Edna St. Vincent Millay
Is there anything better than an apple? Fall is my favorite season and apples play a large role. When October arrives and the leaves turn scarlet and orange, and the air turns cool and crisp, it's time for apple picking. I grew up in Scranton, Pennsylvania where apple picking was mixed with a ride in the wagon through the pumpkin patch. A generation later, my daughters had the same experience growing up in Connecticut. We returned home with bushels of apples, gallons of apple cider, pumpkins from the pumpkin patch, and of course, you had to try some of the warm apple cider and fresh baked cinnamon donuts. I can smell them now.
There is so much you can do with an apple. Eat it plain; slice it, and serve it as a snack with peanut butter; sprinkle it with sugar and cinnamon; bob for it; make delicious tangy candied apples that are so good you can't even wait for the candy to set. And did I mention caramel apples? My mother made them for her ten children all the time. Sometimes, she dipped the caramel and candied apples in coconut or chocolate and candy bits. Perfect for Halloween!
Then there's apple crisp. This is my youngest brother's favorite because it's so quick and easy to make. Just slice the apples and dust them with cinnamon sugar and put them in a buttered pie plate. Then you take a handful of oats and some more butter and cinnamon and crumble it on top of the apples and bake them for a half hour or so. Instant heaven. And you don't even have to make a crust. But of course, there is nothing like a great homemade apple pie.
Good apple pies are a considerable part of our domestic happiness.
Jane Austen
I don't like desserts, or even eat many desserts. But I make an exception for apple pie. I barely think of it as a dessert. As far as I'm concerned, it's real food. And you can dial the sweetness up or down. I personally like my hot, two crust, homemade apple pie (the only kind I will eat) with a piece of melted sharp cheddar cheese. But there are those who like some vanilla or ginger ice cream on the side. Who can blame them?
People say it's as American as apple pie. That has always surprised me. First of all, only the crab apple was native to America although now there are more than 7,000 varieties grown here. Let's remember Johnny Appleseed and the debt we owe him for planting so many orchards. Plus you can find great apple tarts in France, in Spain, and in England. They vary in process but each one is a taste delight. There are many delicious apple pie recipes on my DishandDine website.
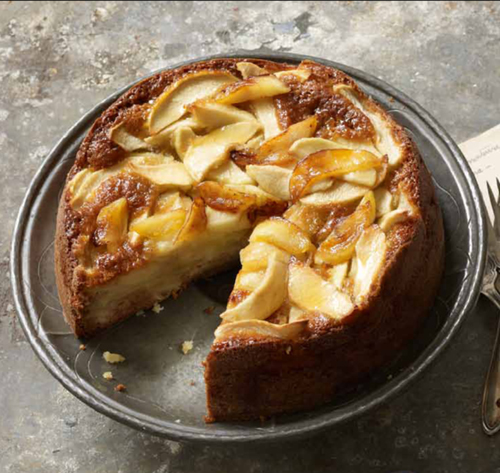
But I thought it would be a special treat to share a new apple recipe with all of you. Our dear friend, Francine Segan, is a true Renaissance woman. We've read her themed cookbooks, listened to her talks on food history, and watched her cook. (See her videos on DishandDine.com) As fall begins, Francine has a beautiful new cookbook, Dolci: Italy's Sweets. Here is a recipe for a fantastic Rustic Tuscan Apple Cake. I felt that we could all use a scrumptious new apple cake recipe. Try it, and the book, too!
Rustic Tuscan Apple Cake

2011-10-28-DolciCovercrop.jpg
  Cookbook Title:
Dolci: Italy's Sweets
Photo: Ellen Silverman
Description:
Pareva la torta di Nonna Papera!
Looks like Grandma Duck's cake!
Said of a particularly pretty cake or pie
A classic! At first glance it may seem like a huge ratio of apple to dough and you're going to be tempted to cut down on the apples. Don't! It looks like a lot of apples, but they magically meld into the batter. You'll love the result. The top half of the cake is chock full of tender apples that float over sweet moist cake.
Deceptively simple, exceptional results.
Ingredients:
2 tablespoons olive oil or butter, plus more for the pan
7 ounces, about 1 1/3 cups, whole wheat or all-purpose flour, plus more for the pan
2/3 cup, plus 1 tablespoon, granulated sugar
2 large eggs or egg substitute
1/2 cup whole milk
2 teaspoons baking powder
1 teaspoon baking soda
Zest of 1 lemon
4 large or 5 medium apples, about 2 pounds total
Preparation:
Preheat the oven to 350 degrees.
Butter and flour an 8-inch cake pan. Beat 2/3 cup of sugar and the eggs in a large bowl, using a whisk or electric handheld beater, until creamy and light yellow. Beat in the flour, milk, baking powder, baking soda and zest. Pour the mixture into the prepared pan.
Peel and core each of the apples. Dice one of the apples and stir the dices into the batter. Cut the remaining apples into thin slices. Spread the slices over the diced apples in the pan in a neat pattern. Press into the batter. Scatter thin pats of butter or drizzle olive oil over the apples and sprinkle with the remaining tablespoon of sugar. Bake for about 75 minutes, until dark golden and cooked through.
This recipe and many other family favorites are available on DishandDine.com. Stop by and become part of this grass roots global food community!

Thursday, October 27, 2011

Dessert review: Meso Maya in Dallas

I’ve been getting more e-mails from people telling me that I need to sample the Pastel de Moras from Meso Maya than I get about my Nigerian Lottery winnings or about how I really need to do something about the size of my penis.
I could wait no longer! This place hasn’t been open for that long and the word is out. They don’t take reservations, so prepare for a wait on a Friday or Saturday night. The strip mall location at Preston and Forest was packed on a Friday night and I settled in for my hour wait for a table with good friends at 7 p.m. The weather was beautiful and I managed to steal a seat on the comfortable patio furniture from the Bettie White look-alike.
Once we finally got seated, I prepared the table for the masterpiece I had heard so much about. We were also drooling at the description of the other desserts. We formed a pact right then and there, that no matter how full we were, we needed three of the desserts on the menu. See, this, folks, is why I love my friends. Never one to back out on a pact or a pinky swear; they understand the importance of dessert.
An hour, several cocktails, and many delicious dishes later, dessert was served. Now, since I consider us to all be good friends by now, I will gift you this one piece of advice. If you do nothing today, do this: Go to Meso Maya and order the Pastel de Moras. The Pastel de Moras is a skillet blueberry cake paired with vanilla bean ice cream. This is a blueberry muffin on crack. It is the Johnny Depp of blueberry muffins. The blueberry “cake” is baked in a cast iron skillet, which is the best part. It gives the edges a crispy texture and the warm blueberries practically melt in your mouth. Pair that with a bite of the vanilla ice cream, and well, I may need some alone time, and extra napkins.
                           
Next up is the Crepas Con Cajeta, which is a buttermilk crepe, caramelized plantains, goat milk caramel, pecans, and vanilla bean ice cream. Think Mexican bananas foster. Not everyone at the table loved it, but I did love the taste of the rich, ripe, cooked plantains with the tart goat milk caramel. It is definitely a taste you have to get used to because when you take a bite, it tastes completely different than you would expect, but that is exactly what I loved about it.
Lastly, we ordered the Pastel de Chocolate, which is a double layer Mexican chocolate cake with strawberry sauce and Rompope. I am a huge fan of the slightly spiced Mexican chocolate cake, and the dollop of muddled strawberries on top was fantastic. However, I fully believe that the Rompope made this dish complete. Rompope is a type of Mexican egg nog, and I am no stranger to the sauce. However, I would have liked to seen more of it on the plate or perhaps infusing the frosting with Rompope? Hell, just bring me the bottle.
                          
Between all the actual sugar and the sugar from the alcohol metabolizing, I was soon about to crash. Once I did, it was not sugarplums I was dreaming about, but the delicious Pastel de Moras whom I plan to meet again very soon.

Wednesday, October 26, 2011

Volcano Pizza

Volcano Pizza, as the name shape is similar volcano would erupt. But if that is, lava is so tempting.

The process is a bit complicated, but if so, satisfaction beyond measure. If curious just try the recipe for one serving pizza volcano below.

Volcano Pizza Ingredients :


Basic dough skin II, 1 / 2 recipe

Shitake mushrooms, 4 pieces, cut into triangles

Chicken breast fillet, 150 grams, cut into rectangular

Onions, 1 / 2 fruit, cut into triangles

Red bell pepper, 1 / 2 fruit, cut into triangles

Tomato concase, 4 tablespoons

Mozzarella cheese, 100 grams

How to make Volcano Pizza :


Contents : Saute onion until fragrant. Add chicken, cook until it changes color. Add tomato concase, shitake mushrooms and peppers. Cook until done, remove and set aside.


Unroll half of dough skin. Place the contents on it.

Unroll remaining dough skin. Together with the skin is given the content, the gyre edge and reserving 1 cm for the pump hose hole.


Pump pizza until fluffy and cover tightly. Bake in oven at 220 degrees Celsius, until cooked. Remove and serve.

Monday, October 24, 2011

Home fruit planting

A home fruit planting carefully selected, properly located, and well managed can enhance the home landscape, provide high?quality fruits and serve as a satisfying hobby. Though is about Apple, Pear, Peach, Plum, Cherry, Apricot, or Strawberry, Blueberries, Raspberries, Blackberries, Grapes, Persimmon, the home fruit garden requires considerable care.

Thus, people not willing or able to devote some time to a fruit planting will be disappointed in its harvest. Growing fruit at home can be fun and provide your family with fresh, flavorful and nutritious food. The benefits are many:
You can grow large amounts of fruit in a relatively small area • Fruits are a good source of vitamins, minerals, carbohydrates, and fiber •
If you carefully choose the kinds and cultivars (varieties) of a fruit before you plant, you can harvest dessert-quality fruit from early summer through the fall
As an added bonus, the fruits you grow will taste much better than the fruits you find in the grocery store. Before you begin, you need to invest considerable effort into site selection, soil preparation, and planting plans. Before you order plants, you also need to learn about their pollination needs, their winter hardiness, and how susceptible they are to pests.
Some fruits are easier to grow than others. Tree fruits and grapes usually require more protection from insects and diseases than strawberries and blackberries.

So, strawberries aren’t much harder to grow than most annual garden crops and bear fruit quickly. Most tree fruits, on the other hand, require a large commitment to pruning, pest management, and care, and they won’t bear fruit right away.
Generally speaking, flowers and fruits of fruit trees must be protected by pesticide sprays from before blossom?time until harvest.
In addition, sprays may be required to protect leaves, the trunk, and branches. window.google_render_ad(); Small fruits are perhaps the most desirable of all fruits in the home garden since they come into bearing in a shorter time and usually require few or no insecticide or fungicide sprays.
Make sure you are ready to devote the time to your planting before you start. The success of your home fruit planting will be determined largely by:
• how susceptible your fruit site is to frost?
• whether your fruit site receives adequate sun.
• whether your site has well-drained soil at least 8 inches deep.
• whether you choose plants that are adapted to your fruit site and winter hardy.
• your ability to prevent fruits damage from diseases, insects, weeds and wildlife. • your ability to use good fruits cultural practices, including providing adequate water.
• your ability to do what is required in a timely manner. Fresh fruits can be available throughout the growing sea­son with proper selection of types and cultivars (varieties). Fruits soils and sites Plant fruits avoiding poorly drained areas.
Deep, sandy loam soils, rang­ing from sandy clay loams to coarse sands or gravel mixtures, are good fruit soils.
On heavier soils, plant in raised beds or on soil berms to improve drainage. All fruit crops are subject to damage from late spring freezes. Hills, slopes or elevated areas provide better air drain­age and reduce frost damages.
Make certain that the air can move freely throughout the planting site and is not “boxed” in with surrounding terrain or tree borders. Fruits do best in full sun. They can tolerate partial shade, but fruit quality will be lowered. Size of fruits planting area Plan the fruit planting to fit the area involved as well as family needs.
A smaller planting, well cared for, will usually return more quality fruit and enjoyment to the grower than a larger neglected one. One?half acre or less planted to adapted cultivars of the best kinds of fruit is usually adequate for the average family. Plans for fruits planting While growing fruit at home can be rewarding, it will cost time and money. To reduce these costs, carefully consider the design of your planting, including arrangement, spacing, cultivar selection, number of plants, and aesthetics. Develop a planting plan well in advance of the planting season.
Determine the kinds of fruits, cultivars, and quanti­ties of each needed. Locate a source of plants and make arrangements for plants to be available at the desired time of planting. One common mistake is to put the plants too close together. Allow ample room for growth so you can prune and perform other tasks.
Another common error is to put in more plants than you need. A small planting that receives proper care will yield more good-quality fruit than a larger planting that is neglected. Perennial weeds such as bermudagrass and johnsongrass compete heavily with young plantings and should be elimi­nated before planting. This can be done by spraying with a post?emergence herbicide such as glyphosate (Roundup‰) in late summer the year before planting or by shading out weeds by growing hybrid sudangrass for the year prior to planting. Strawberries especially should not be planted in newly turned under bermudagrass sod.
Not only will the bermu­dagrass regrow and cause extreme competition problems because of the short height of the strawberry plants, but the white grubs that frequently infest bermudagrass sod can destroy the strawberry roots. For best survival and production, supplemental water should be provided in the summer. Locate your fruit plantings near a water source.
Fruit planting If possible, set the plants immediately after arrival. If fruits roots are dry, completely immerse the roots in water for a few minutes or overnight before planting. Always water plants immediately after planting. Never allow the roots to dry out or freeze. When trees planting is delayed several days, heel in the trees by forming a mound of loose soil or mulching material. Place the roots into this mound, cover them, and moisten.
The trees may be vertical or horizontal as long as the roots are covered. This protects the fruit trees from drying or freezing.
Set trees about the same depth that they grew in the nursery row. Trim off broken and dried roots. Place topsoil around the roots and firm the soil to exclude air. Settle the soil with water and make sure the roots are left in a natural outward position. Leave a small basin one or two inches deep around the tree to aid in watering.
Prune back about one?third of the tree top. Wrap the trunk from the soil line up to the first branches (or 18 inches above the ground) to protect the trunk from sunscald, rodent injury, insect damage, and drying out. Fruit plants cultural practices During the first summer, cultivate or mulch around the fruit plants to reduce competition from other plants and to conserve moisture and fertility. Irrigation is especially important in the first few years while the planting becomes established. Pollination and fruits set One of the most common questions home fruit growers ask is, “Why won’t my plants set fruit?” There are many possible reasons for poor fruit set, including:
• a late spring frost.
• cold or rainy weather during bloom.
• disease.
• poor plant nutrition.
• inadequate pollination.
• lack of a compatible cultivar for cross-pollination in species that are not “self-fruitful.” Pollination and subsequent seed development are prerequisites for fruit set. With most fruits, flowers that appear in early spring begin as buds that form in the axils of the leaves during the previous year.
Flowers of many fruits bloom during early spring and can be damaged by frost. If temperatures fall below 30 degrees F when the flowers are vulnerable, some or all may be killed, reducing or eliminating fruit set.
Pollination occurs after the flowers have opened. Some fruits, such as grapes and peaches, shed pollen from their anthers (the male part of the flower), which falls by gravity or is carried by wind currents to the pistil (female part of the flower). With strawberries, blueberries, apples, plums, and sweet cherries, insects carry the pollen from flower to flower.
Heavy rains during bloom can interfere with pollen distribution or insect activity. Seed formation will be poor if pollination is inadequate, and seed formation is essential for the growth and development of most fruits. For example, apples with only a few seeds will fall off the tree in June or remain small and misshapen.
Some fruits, such as strawberries, raspberries, peaches, tart cherries, and grapes, are self-fruitful fruits. Each plant can set fruit with just its own pollen. Other fruits, such as apples, sweet cherries, pears, plums, apricots, and elderberries, are not self-fruitful fruits.
They require cross-pollination from another cultivar for fruit to set. Blueberry plants are self-fruitful, but berry size is larger with cross-pollination from another cultivar. Most nursery catalogs provide information about which cultivars are good for pollinating each other-for blueberries and other fruit crops as well.
Certain apple cultivars, such as Jonagold and Rhode Island Greening, produce pollen that is ineffective in setting fruit on other cultivars. To be sure of adequate cross-pollination, plant at least three different apple cultivars. With groups of sweet cherry cultivars, the pollen of some cultivars is not compatible with others within the group.
Yet the cultivar Stella is cross compatible with most sweet cherry cultivars and provides a good source of pollen for other cultivars. Stella is also self-fruitful. Many European plums (often called prune plums because of their high sugar content) are partially self-fruitful. But you can improve their fruit set by planting two or more cultivars.
You will need to plant two or more cultivars of Asian plums because most are not self-fruitful. Plant all fruit trees used as “pollenizers” within 100 feet of the cultivar to be pollinated. You may need fewer plants if you rely on neighbors’ trees as pollenizers, but you could have a major problem if those trees are destroyed.
Aura Angheliu is a Romanian floral designer with many ideas of natural decorations, freelance writer of nature, flowers and plants, traditional treatments and of the flower shop business. She also loves nature, flowers and to make floral arrangements.

Friday, October 21, 2011

One bottle of wine

If you have ever bought a bottle of wine you thought you loved and felt disappointed because it didn’t taste as good as the last one, you’re not alone.

There are a 1,000 reasons why this might happen. The more processed and industrialised a wine is, the more likely you are to find uniformity from one bottle to the next.
At the extremes of this scale, you might say it’s like buying a lurid packet of Mr Kipling’s cakes (Blossom Hill, anyone?) compared to a box of plums (natural wine), some of which will taste sweeter than others and one or two of which might have a little bruise.
But what about all those wines in between? The ones we find in the supermarket that aren’t corked or oxidised or anything else but just… don’t taste as we remember them?
Timing makes a difference, of course: wines develop, which can be a good thing or, on occasion, a very bad thing. Some cheap wines don’t have the power to last the year they need to be on shelf before the next vintage comes along.
Like a marathon runner who hasn’t put in the training, you can feel them flagging after six months; by the 10th they’re lying by the side of the road waiting for St John Ambulance.
There were a couple of those at the recent Asda press tasting. “This is completely shagged,” as one of my tasting colleagues put it of the Asda Corbières 2009 France (£3.56), a technical term that didn’t go down awfully well with the buyer.
The 2010 of the same wine, by contrast, looked really good – but it was an as-yet unbottled tank sample, due to arrive some time before Christmas, so I’d want to taste it again in its finished condition before recommending it.
With the cheapest wines, it’s common practice for supermarket buyers to tweak the blend that goes into a particular label across the year to keep it tasting fresh.

For example, a white blend of colombard and ugni blanc from southern France might be made dryer as the year wears on because as its acidity fades, too much sweetness will make it taste lazy and sluggish.
You’re not necessarily being short-changed by being given a different wine; the idea here is to create a greater semblance of consistency, although you may well notice a difference.
Talking of blends, a bottle of wine looks so neat and tidy it is easy to believe that one is identical to the next, but it’s logical that the number you can make from the same batch is dictated by the size of your largest mixing bowl.
That’s why Ernest & Julio Gallo have a subterranean blending tank so large they have been known to invite a full-sized orchestra to play inside it.
And why, at the Cave de Saumur, an excellent co-operative in the Loire, they have eight tanks each with a capacity of 100,000 litres, or about 130,000 bottles of wine. This blend can then be stored in smaller tanks and bottled to order – wine ages more slowly in tank than it does in bottle, so the idea here is to keep the wine fresh until it’s sold.
In theory, new bottlings should taste virtually the same but, somehow, sometimes, they just don’t.
I’ve known buyers ask for fresh samples to be sent out to journalists because a new bottling wasn’t showing as well at a tasting as they felt it should.
I’ve also tasted wines that appear to be the same but vary so wildly in quality I find it hard to believe they could possibly have come from the same blend at all.
A case in point was Waitrose’s own-label claret which, last autumn, I tried on several occasions inside a week, fascinated by its extreme awfulness. How could anyone let such a wine through? It tasted as if a small family of mice had been drowned in it and left to decompose.
Two months later, I called the wine in again, feeling certain that it would make the grade for an article I was writing on what not to buy. And guess what?
It tasted completely different – an improvement I would find hard to put down to a couple of months of ageing in bottle.
Sometimes wines go the other way. I’ve seen competition judges frowning in lack of recognition over wines which, just a few months earlier, they had garlanded with awards.
Could it be that, sometimes, a winning blend sells out and a lesser blend, from different tanks, is made and bottled in its stead?
“That would be a very big accusation,” Philippa Carr at Asda points out.
All of this variability might seem taxing, but it’s life: if we really want wine to be produced on a grand enough scale to stock every supermarket in the land, then different bottlings and blends are an inevitable outcome.
And, most of the time, they do work in our favour.